Investigating cells under the light microscope
What this lesson covers
- The parts of a compound light microscope, what each does, and how to focus from low power to high power.
- How to prepare wet mounts, epidermal tears and cavity slides, and which stains show which structures.
- Field of view, total magnification and the magnification of a drawing, with units in mm and µm.
- The conventions of a biological drawing, and what a marker counts as a convention error or a representation error.
- Linking specialised features of plant cells and unicellular organisms to their function, and explaining how they help for Merit.
The light microscope and its parts
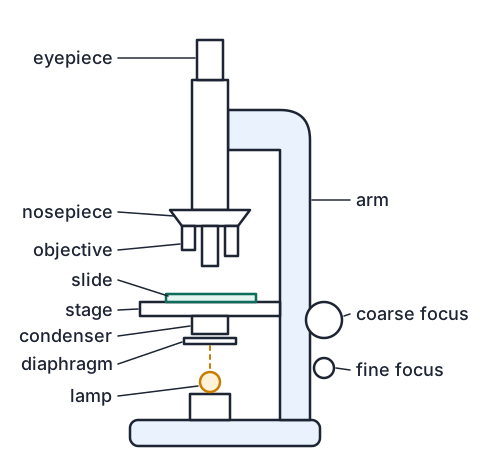
- Light from the light source passes up through the condenser and the iris diaphragm, through the specimen on the slide, then through an objective lens and the eyepiece to your eye.
- Total magnification = eyepiece magnification × objective magnification, so a ×10 eyepiece with a ×40 objective gives ×400.
- The coarse focus moves the stage a long way and is only for low power; the fine focus sharpens the image and is the only knob to use at ×400.
- The iris diaphragm controls how much light gets through. Closing it a little increases contrast, which helps with unstained, almost see-through cells.
- The image is upside down and back to front, so to move the image to the left, move the slide to the right.
| Part | Job |
|---|---|
| Eyepiece | magnifies the image from the objective, usually ×10 |
| Objectives | the main lenses, usually ×4, ×10 and ×40, on a turning nosepiece |
| Stage and clips | hold the slide over the hole the light comes through |
| Coarse and fine focus | move the stage to bring the specimen into focus |
| Condenser and diaphragm | focus the light on the specimen and control its brightness and contrast |
Getting a specimen in focus
- Start on the lowest power objective (×4), with the slide clipped on and the specimen over the hole in the stage.
- Looking from the side, use the coarse focus to bring the objective and slide close together, without letting them touch.
- Now looking through the eyepiece, focus by moving them apart, so you can never crash the lens into the slide.
- Move the part you want into the centre, then turn to ×10, refocus, centre again, and turn to ×40 using the fine focus only.
- Adjust the diaphragm until the cells stand out: bright enough to see, dim enough for edges to show.
Preparing slides and choosing a stain
- The standard needs two kinds of plant tissue and one single-celled organism, prepared and viewed by you, not a ready-made slide.
- Specimens must be thin enough for light to pass through: often one cell layer. That is why we peel, tear or cut thin sections.
- For a wet mount, put the specimen flat in a drop of water or stain, touch one edge of a coverslip to the drop at about 45°, and lower it slowly with a mounted needle so no air bubbles are trapped. Blot the extra liquid with paper towel.
- A stain makes see-through structures visible: iodine turns starch blue-black and makes nuclei and cell walls easier to see, and methylene blue stains nuclei blue.
- Living unicellular organisms swim out of view, so use a cavity slide and a drop of methyl cellulose to thicken the water and slow them down.
| Material | Preparation | Look for |
|---|---|---|
| Onion bulb epidermis | peel the thin inner skin of a scale leaf; wet mount in iodine | brick-shaped cells, cell walls, nuclei, no chloroplasts |
| Leaf lower epidermis | epidermal tear: tear the leaf at a slant to peel the lower skin; wet mount in water | guard cells round stomata, puzzle-shaped epidermal cells |
| Elodea (oxygen weed) leaf | a whole young leaf in a drop of water, no stain needed | many chloroplasts, cell walls, large vacuole |
| Potato tuber | scrape a thin smear of the cut surface; wet mount in iodine | blue-black starch grains |
| Paramecium | a drop of pond or culture water on a cavity slide with methyl cellulose | cilia, oral groove, food and contractile vacuoles |
Example: field of view and cell size
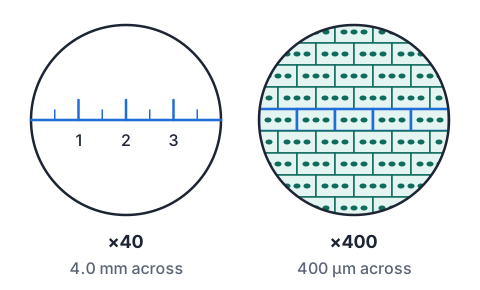
- A student put a clear millimetre ruler on the stage at ×40 (×10 eyepiece, ×4 objective) and measured the field of view as 4.0 mm across.
- At ×400 she saw five Elodea leaf cells end to end across the diameter. Estimate the length of one cell in µm.
- ×400 is 10 times the magnification of ×40400 ÷ 40 = 10
- field of view at ×400 = 4.0 mm ÷ 10 = 0.40 mmten times the magnification shows a field one tenth as wide
- 0.40 mm × 1000 = 400 µm1 mm = 1000 µm
- one cell ≈ 400 µm ÷ 5 = 80 µm
- 400 µm × 5 = 2000 µmmultiplies instead of dividing: a 2 mm plant cell would be visible by eye
The rules of a biological drawing
- Draw what you actually see on your own slide, in sharp pencil, large (at least half a page), with single clear lines that join up with no gaps between cells.
- No shading, colouring, hatching or dots for texture; draw organelles as outlines.
- Give a title that names the material and the view (for example Elodea leaf cells), and the magnification you used (×10 eyepiece × ×40 objective = ×400).
- Label lines are ruled in pencil, end exactly on the part, never cross each other, and the labels sit in a neat column outside the drawing.
- Shape and proportions must match the material, and include only organelles a light microscope shows at that magnification: no ribosomes or mitochondria detail from textbook electron micrographs.
Example: the magnification of a drawing
- The student draws one of her 80 µm Elodea cells 120 mm long.
- What is the magnification of the drawing, and how long should a 20 µm scale bar be?
- magnification = drawing size ÷ actual sizeboth in the same unit
- 120 mm = 120 × 1000 = 120 000 µm
- magnification = 120 000 µm ÷ 80 µm = ×1500
- scale bar = 20 µm × 1500 = 30 000 µm = 30 mm
- the microscope was at ×400 but the drawing is ×1500, so state which one you meanNZQA asks for the magnification used on the microscope
Linking specialised features to function
- A specialised feature can be the shape of a cell, how cells are arranged in a tissue, or whether an organelle is present, and how many there are or where.
- For each feature, name it, say what it does, and then (for Merit) explain how or why it lets the cell or tissue do its job well.
- Compare cells to spot features: onion bulb epidermis has no chloroplasts, but Elodea leaf cells are packed with them.
| Cell or tissue | Feature | How it helps |
|---|---|---|
| Elodea leaf cell | many chloroplasts, pushed to the edge by a large vacuole | more chlorophyll near the light for photosynthesis |
| Elodea leaf | only two cells thick | carbon dioxide and oxygen diffuse a short distance to and from the water |
| Onion bulb epidermis | tightly packed cells, no gaps, no chloroplasts | a protective layer; it grows in the dark, where chloroplasts would be no use |
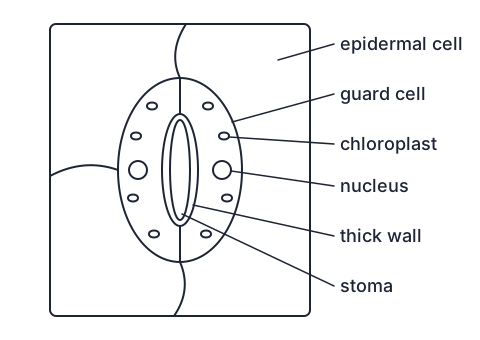
| Guard cells | kidney shape, thick inner walls, chloroplasts | change shape to open and close the stoma for gas exchange |
| Paramecium | contractile vacuoles | pump out water that enters by osmosis from fresh water, so the cell does not burst |
| Paramecium | cilia and oral groove | beat to move the cell and sweep food into the oral groove |
Example: a Merit annotation for guard cells
- Achieved names a feature and links it to a function. Merit gives the reason how or why the feature makes the cell good at that function, step by step.
- Achieved: The guard cells have thick inner walls and are found in pairs around a stoma. They open and close the stoma to let gases in and out of the leaf.
- Merit: When water moves into the guard cells by osmosis they become turgid and swell. The inner wall next to the pore is thicker and stretches less than the thin outer wall, so as the cells swell they bend outwards, away from each other, and the stoma opens. Carbon dioxide can then diffuse into the leaf for photosynthesis. When the guard cells lose water they become flaccid, straighten, and close the stoma, reducing water loss.
- Notice the Merit answer uses the feature you can see (the thick inner wall) as the reason the cell bends, not just as a label.
The unicellular organism
- A unicellular organism carries out every life process in one cell, so its organelles do the jobs that whole organs do in a plant or animal.
- Paramecium is common in pond water: slipper shaped, covered in cilia, with an oral groove, food vacuoles, a large macronucleus and contractile vacuoles at each end.
- Fresh pond water is more dilute than the cytoplasm, so water keeps entering by osmosis; the contractile vacuoles fill and squeeze it out again.
- Draw it at ×100 or ×400 once it has slowed down, and draw only what you can see on your slide: cilia often show as a fuzzy edge that you draw as short lines round the outline.
- Euglena, which has chloroplasts and a flagellum, and yeast, a single-celled fungus, are other organisms schools use.
What Achieved and Merit look like
- AS 91160 has Achieved and Merit only, with no Excellence. Both need three slides prepared and viewed: two kinds of plant tissue and one single-celled organism.
- Achieved: each slide is prepared and viewed, each drawing records your observations, and features are identified and linked to function. A few convention errors or minor inaccuracies are allowed.
- Merit: reasons for how or why each feature makes the cell good at its function, and drawings whose small errors do not make them a less accurate record of the material.
- Markers separate convention errors (a missing title, shading, crossing label lines, gaps between cells) from representation errors (wrong cell shape or proportions, missing typical organelles, organelles a light microscope cannot show).
| Grade | An annotation for Elodea chloroplasts |
|---|---|
| Achieved | Elodea leaf cells have many chloroplasts. Chloroplasts carry out photosynthesis to make glucose. |
| Merit | Each Elodea leaf cell holds many chloroplasts, pressed against the cell wall by the large central vacuole. Having many chloroplasts means more chlorophyll to absorb light, and lying near the cell surface they get the most light and are close to the carbon dioxide diffusing in from the water, so the cell can photosynthesise faster and make more glucose. |
Common mistakes
- I shaded the chloroplasts in green so they stand out.Biological drawings use pencil outlines only; shading or colouring is a convention error.
- I focused at ×400 using the coarse focus knob.At high power use only the fine focus; the coarse focus can push the objective into the slide and crack it.
- The field of view is 4.0 mm at ×40, so it is 40 mm at ×400.More magnification shows a smaller area: ×400 is ten times ×40, so the field is 4.0 ÷ 10 = 0.40 mm.
- I drew the cell with mitochondria and ribosomes because textbook cells have them.Draw only what your own slide shows at that magnification; electron microscope detail is a representation error.
Make a water-drop microscope
You need: a clear plastic takeaway lid, a ruler with millimetre marks, a drinking straw, a glass of water, two equal stacks of books, an onion
- Lay the ruler on a table between the two stacks of books, and rest the lid across the stacks about 1 to 2 cm above the millimetre marks.
- Dip the straw in the water, cover the top with a finger, and let one drop about 5 mm wide fall onto the lid above the scale.
- Look straight down through the drop with both eyes open, and compare one magnified millimetre with the normal marks beside the drop: if it covers about 3 mm, the drop magnifies about ×3. Count how many millimetres you can see through the drop: that is its field of view.
- Add a much smaller drop next to it and repeat, then peel the thin skin from inside an onion layer with your fingers, lay it flat on the lid and look at it through each drop.
- Look for: the smaller, more curved drop magnifies more but shows fewer millimetres, just as a ×40 objective shows a smaller field than a ×4; under the onion skin you may just make out a pattern of cells.
Safety: Never look at the sun or a bright lamp through the water drop or any lens, because it focuses the light and can burn the back of your eye.
Your turn
What is the total magnification with a ×10 eyepiece and a ×10 objective?
The field of view at ×100 is 1.8 mm. What is it at ×400, in µm?
Six cells fit across a 1.8 mm field of view. How long is one cell, in µm?
A 50 µm guard cell is drawn 75 mm long. What is the magnification of the drawing?
A drawing at ×2000 needs a 10 µm scale bar. How long should the bar be, in mm?
Name the convention error: the student labelled each organelle with an arrow drawn freehand that crossed another label line.
Show answer
1. 10 × 10 = ×100. 2. ×400 is 4 times ×100, so 1.8 ÷ 4 = 0.45 mm = 450 µm. 3. 1.8 mm = 1800 µm; 1800 ÷ 6 = 300 µm. 4. 75 mm = 75 000 µm; 75 000 ÷ 50 = ×1500. 5. 10 µm × 2000 = 20 000 µm = 20 mm. 6. Label lines must be ruled lines (not arrows), must not cross each other, and should end exactly on the part.
Write it up
Your onion epidermis slide shows no chloroplasts. Write an Achieved annotation linking this to where the tissue grows.
Write a Merit annotation explaining how the contractile vacuoles help Paramecium survive in pond water.
A drawing of Elodea cells has gaps between the cells and no chloroplasts drawn. Is each a convention error or a representation error?
Show answer
1. Onion bulb epidermis cells have no chloroplasts because the bulb grows underground, where there is no light for photosynthesis. 2. Pond water is more dilute than the Paramecium's cytoplasm, so water keeps moving into the cell by osmosis. The contractile vacuoles collect this extra water and squeeze it out through the membrane, so the cell does not swell and burst, and its cytoplasm stays at the right concentration for its reactions. 3. The gaps are a convention error: cells in a tissue are drawn touching, sharing their walls. Leaving out the chloroplasts is a representation error: they are typical organelles of Elodea cells and show clearly at ×400, so the drawing is no longer an accurate record.
Recap
- Focus on low power first; use only the fine focus at ×400.
- Thin specimens, the right stain, and a coverslip lowered at an angle give a clear view.
- Total magnification = eyepiece × objective; field of view shrinks as magnification grows; drawing magnification = drawing size ÷ actual size in the same units.
- Draw what you see, in pencil outlines, with a title, the magnification and ruled labels.
- Merit explains how each feature makes the cell good at its job, not just what the feature is.
| Formula | Use it for |
|---|---|
| total magnification = eyepiece × objective | the magnification used |
| new field = old field × old magnification ÷ new magnification | field of view at higher power |
| cell size = field of view ÷ number of cells across | estimating cell length |
| magnification = drawing size ÷ actual size | a drawing or a photo |
| 1 mm = 1000 µm | converting before you divide |
The maths behind it
How is NCEA Level 2 maths going?
See the NCEA Level 2 maths guide